
|
Localization process |
Localization should not be a single task that you perform after everything else but an ongoing process throughout the product lifetime. Such kind of process is called continuous localization. Using Soluling, you can make the localization process a part of your development process. You can start localization at an early phase of the development, and the localization process can continue simultaneously with the development process.
Traditionally location process contains three steps: Create a project, translate it, and finally build the localized files or database items.
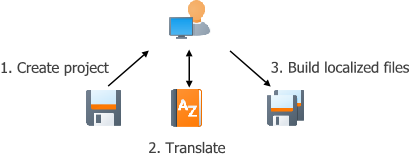
When you create a project, you select the files or databases you want to localize. Soluling scans the selected items and extracts the elements that need to be translated. After you have created the project, you can fine-tune the project settings and settings of each item in such a way that only those items that you want to localize are included in the project. For example, you might exclude some strings and include some rare resource types. You can change the setting at any time. Because these settings determine what items are included in the project, Soluling will rescan the selected items after you have changed settings. Also, if the original files get changed (e.g., application get changed), you should let Soluling rescan the items. After each rescans, the project contains all the items found from the original files. The rescan process does not affect your existing translation, but they remain unchanged.
When you have a project file, it should be translated. Soluling gives you several ways to translate the project. The next paragraphs on this page described different translation options.
The third step is the build step, where Soluling uses the original files and translation in the project file to create localized files. You can perform a build step at any time. Your project file does not need to be fully translated. If there is no translation for a specific item, Soluling will use the original value. You should build the localized files right after you have created the project to make sure that the localized files or databases can be properly created. Every time you receive or import new translation, you can let Soluling build localized files. Testing localized files is an essential part of the build step.
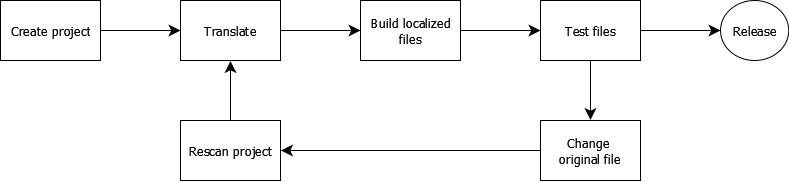
When using continuous localization, you perform the same steps but instead performing them once you repeat the translate and build steps each time you have modified your source code. You typically perform translate-build steps on several items, for example, after you have changed original files or found a translation error on the localized files. The process keeps going until all items are translated into all languages, and there are no changes in the original files. Once you change original files or you want to add a new target language, you continue the process.
Most often, a developer or localization engineer controls the process. She creates the project, builds the localized files, and in many cases, also tests the localized files. Create and build steps are pretty automatic. When creating a new project, Soluling collects all the information needed for the project. The build step is simply a matter of clicking one button on Soluling. The translation step, on the other hand, requires much more work, and in most cases, additional human resources are needed. Let's study different translation methods.
If you know well both the original language (i.e., language used in the original files) and the target language(s), you can do the translation job all by yourself.
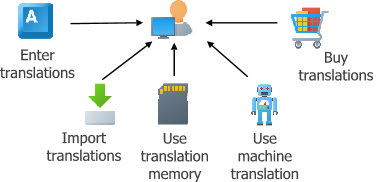
You can either type the translation in the translation grid, you can import translations from various sources, you can use translation memory to reuse existing translation, or you can use machine translation to automate translation task. Because you work alone with the project, there is no need to share it. You do everything by yourself. Unfortunately, the above scenario is very rare. Very few developers can both develop an application and translate it to all target languages that are needed. In most cases, you need the help of translators.
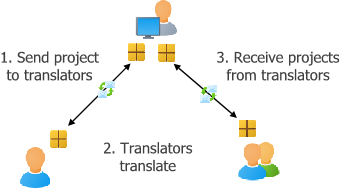
When you use translators, you can target more languages, but it also introduces some challenges. The most obvious is how to deliver strings to the translator and in what format. In the old times, text files and Excel sheets were used extensively. They seemed like an easy solution but generated massive extra work when preparing the localization kits when receiving translated kits. Soluling lets you create an exchange package (i.e., localization kid) easily. You can then send the package to the translator using email, for example. Once the translator has completed the translations, she will send you back the translated package. You import the package, and all the translation done by the translator will appear in your main project file.
The above process works well and does not require any additional software. However, if the number of target languages if high or your original files change often, you have to create exchange packages frequently and send them to a translator and finally import them back one by one. This job may be frustrating and should need some optimization. You can use this method only if your translator also uses Soluling's desktop tool. There is a free translator edition and a low-cost professional translator edition available. If they do not use it, then you have to export data into the format that the translator can use and then manually send the file to the translator.
![]() Copyright © 2016-2026 Soluling Oy
Copyright © 2016-2026 Soluling Oy