
|
Subtitle File Localization and Internationalization |
Subtitle files add subtitles to videos. Soluling Desktop and Soluling Cloud support the following subtitle file formats.
| Name | Description |
|---|---|
| SubRip | SubRip subtitle files (.srt) |
| WebVTT | WebVTT files (.vtt) |
The end of the document contains links to get the full source code of the samples. After reading this document, we recommend reading a tutorial about how to use Soluling.
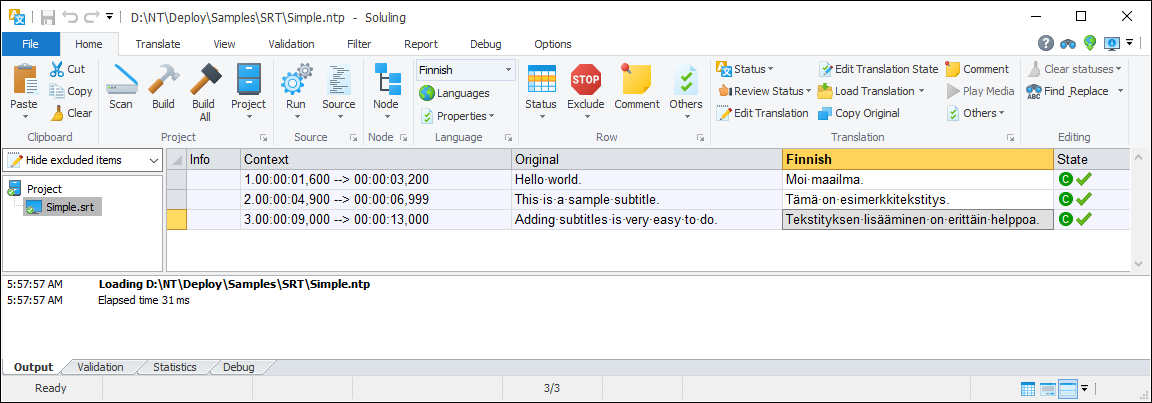
A subtitle file contains one or more subtitles. Here is the Samples\SRT\Simple.srt sample file.
1
00:00:01,600 --> 00:00:03,200
Hello world.

2
00:00:04,900 --> 00:00:06,999
This is a sample subtitle.

3
00:00:09,000 --> 00:00:13,000
Adding subtitles is very easy to do.
The file contains three subtitles. A SubRip subtitle has three parts: an index, a time range, and the text. An empty line separates the subtitles. A WebVTT file has a WEBVTT header, and a subtitle has no index. Soluling localizes only the text and keeps everything else unchanged. Here is the Finnish file, fi\Simple.srt.
1
00:00:01,600 --> 00:00:03,200
Moi maailma.

2
00:00:04,900 --> 00:00:06,999
Tämä on esimerkkitekstitys.

3
00:00:09,000 --> 00:00:13,000
Tekstityksen lisääminen on erittäin helppoa.
Soluling writes the localized file into a language subdirectory next to the original file. WebVTT notes (NOTE) are not localized.
By default, Soluling scans each subtitle into its own row. This works well if each subtitle contains complete sentences, as in the sample above. Each row then contains a complete sentence that is easy to translate.
However, in most subtitle files, a sentence continues over two or more subtitles. Here is the Samples\SRT\SimpleSegment.srt sample file.
1
00:00:01,600 --> 00:00:03,200
Hello world. This is

2
00:00:04,900 --> 00:00:06,999
a sample subtitle. Adding

3
00:00:09,000 --> 00:00:13,000
subtitles is very easy to do.
It contains the same text, but the sentences continue from one subtitle to the next. The SimpleRequiresSegmentation.ntp project scans the file subtitle by subtitle.
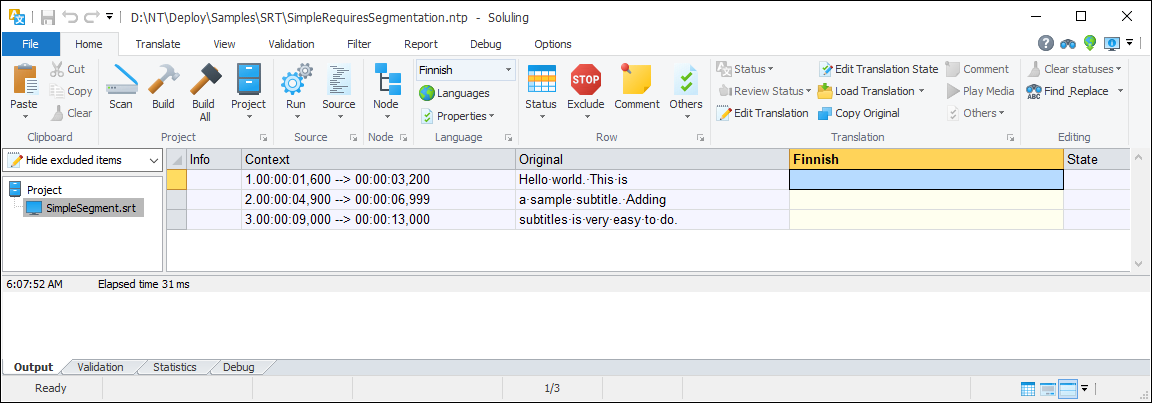
The rows are hard to translate because they do not contain complete sentences. The solution is to use segmentation.
With segmentation, Soluling combines the text of the subtitles and splits the combined text into sentences. The translator works on complete sentences. When Soluling builds the localized file, it splits the translated sentences back into the subtitles in proportion to the original text, so the localized file has the same subtitles and time ranges as the original file.
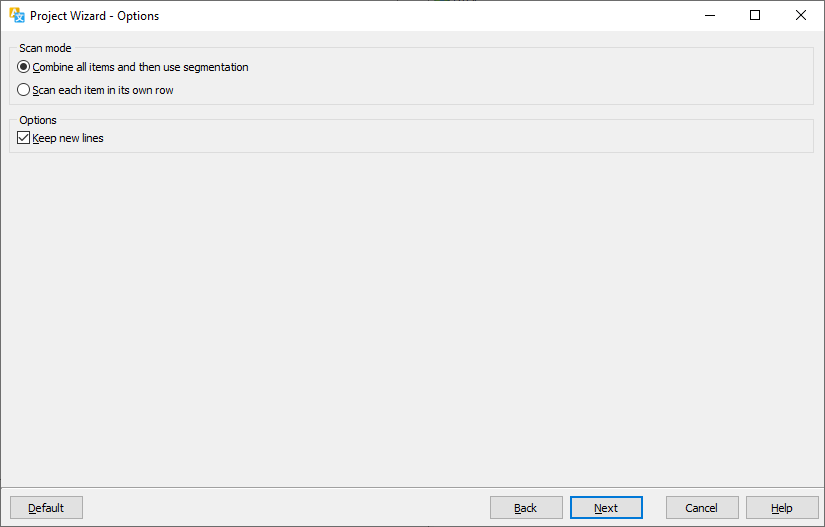
To use segmentation, select Combine all items and then use segmentation on the Options sheet when you create the project, or later when you edit the source options. The Segmentation sheet sets the segmentation rules.
Now the rows contain complete sentences, and the project is much easier to translate.
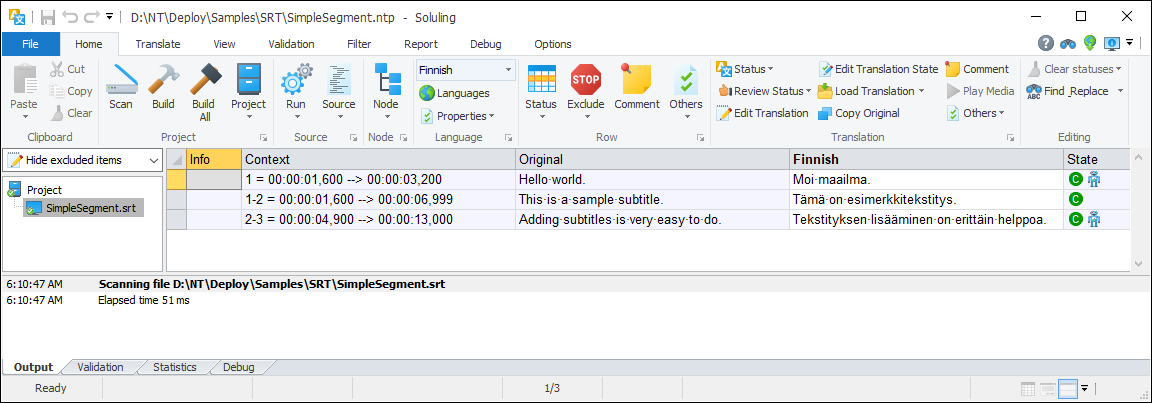
The SimpleSegment.ntp project uses segmentation. Here is its Finnish file.
1
00:00:01,600 --> 00:00:03,200
Moi maailma. Tämä on

2
00:00:04,900 --> 00:00:06,999
esimerkkitekstitys.
Tekstityksen

3
00:00:09,000 --> 00:00:13,000
lisääminen on erittäin
helppoa.
When segmentation is used, the localized file does not contain the WebVTT notes.
A subtitle can have several lines. By default, Soluling keeps the line breaks of a subtitle in the row, so the translator can break the translation in the same way. If you uncheck Keep new lines on the Options sheet, Soluling combines the lines into one line.
A translation is often longer than the original text. Set the maximum line length on the Write options sheet, and Soluling splits longer lines of the localized file after a word. By default, the line length is unlimited. When segmentation is used, Soluling splits the lines at the length of the longest original line. The MultiLine.ntp sample uses a maximum line length of 20 characters.
 Desktop process
Simple.srt) on Soluling or click the New from File or Files button and select the file.fi\Simple.srt.When you change the original subtitle file, open the Soluling project and choose Home | Scan. Soluling keeps the existing translations, and you only translate the subtitles that were added or changed.
 Cloud process
With Soluling Cloud, you localize the subtitle file in your browser: upload the file, translate it in Translate, and download the localized files. You need a Soluling account. See the available Cloud plans.
When you upload a subtitle file, Soluling Cloud scans each subtitle into its own row. If you want to use segmentation, create the project in Soluling Desktop, and upload it to Soluling Cloud. See below.
Simple.srt), or drag and drop the file onto the page. Click Create.Click the project's green Translate button on the dashboard. Translate opens the project, and you can type the translations into the grid. Machine translation suggestions, translation memory, and spell checking are available there. You do not have to finish every language before moving on to the next step.
Simple.fi.srt, or where your video player reads it.When you change the subtitles, upload the new original file, translate what is new or changed, and download the localized files again. On the dashboard, click the project's Update file button (the upload arrow), select the new file or drop it onto the page, and click Update. Existing translations are kept, so you only translate the subtitles that were added or changed.
.ntp).When the subtitles change, choose Home | Scan in Soluling Desktop, click Upload to Cloud, translate the new and changed subtitles, and import and build again.
The dashboard is one of four ways to use Soluling Cloud. You can also use the SoluCLI command-line tool, Soluling Desktop, or SoluMake, which can run the update and build steps in your build pipeline. See the Cloud tutorial for all of them.
GitHub and <data-dir>\Samples\SRT contain the following SubRip samples. Each .ntp file is a Soluling project that localizes the subtitle file into Finnish. The localized files are in the fi subdirectory after you build the project.
| File | Description | Notes |
|---|---|---|
| Simple.srt Simple.ntp |
Three subtitles that each contain complete sentences. Each subtitle is scanned into its own row. | Try this first! |
| SimpleSegment.srt SimpleSegment.ntp SimpleRequiresSegmentation.ntp |
The same text as above, but the sentences continue over the subtitles. SimpleSegment.ntp uses segmentation, and SimpleRequiresSegmentation.ntp scans each subtitle into its own row. | |
| Segment.srt Segment.ntp |
A longer subtitle file that uses segmentation. | |
| MultiLine.srt MultiLine.ntp |
Subtitles with several lines. The project uses a maximum line length of 20 characters. | |
| Blackbird.srt Blackbird.ntp |
A long subtitle file of a video. The project uses segmentation and does not keep the line breaks. It contains no translations. |
GitHub and <data-dir>\Samples\WebVTT contain the following WebVTT samples.
| File | Description | Notes |
|---|---|---|
| Simple.vtt Simple.ntp |
Three subtitles that each contain complete sentences. | Try this first! |
| SimpleSegment.vtt SimpleSegment.ntp |
The same text as above, but the sentences continue over the subtitles. The project uses segmentation. | |
| Segment.vtt Segment.ntp |
A longer subtitle file that uses segmentation. The project uses a maximum line length of 32 characters. | |
| Note.vtt Note.ntp |
Subtitles and notes. The notes are not localized. |
You create a subtitle localization project by adding a subtitle file (e.g., D:\Sample\Simple.srt) into your Soluling project. You can configure how to localize your subtitle file
by selecting the item in the project tree, right-clicking, and choosing the Options menu. A source dialog appears that lets you edit the options. This source uses the following option sheets.
 Copyright © 2016-2026 Soluling Oy